Going back in Time: Reviving an old Windows Home Server as a Time Machine Backup Destination for Mac
The Hardware
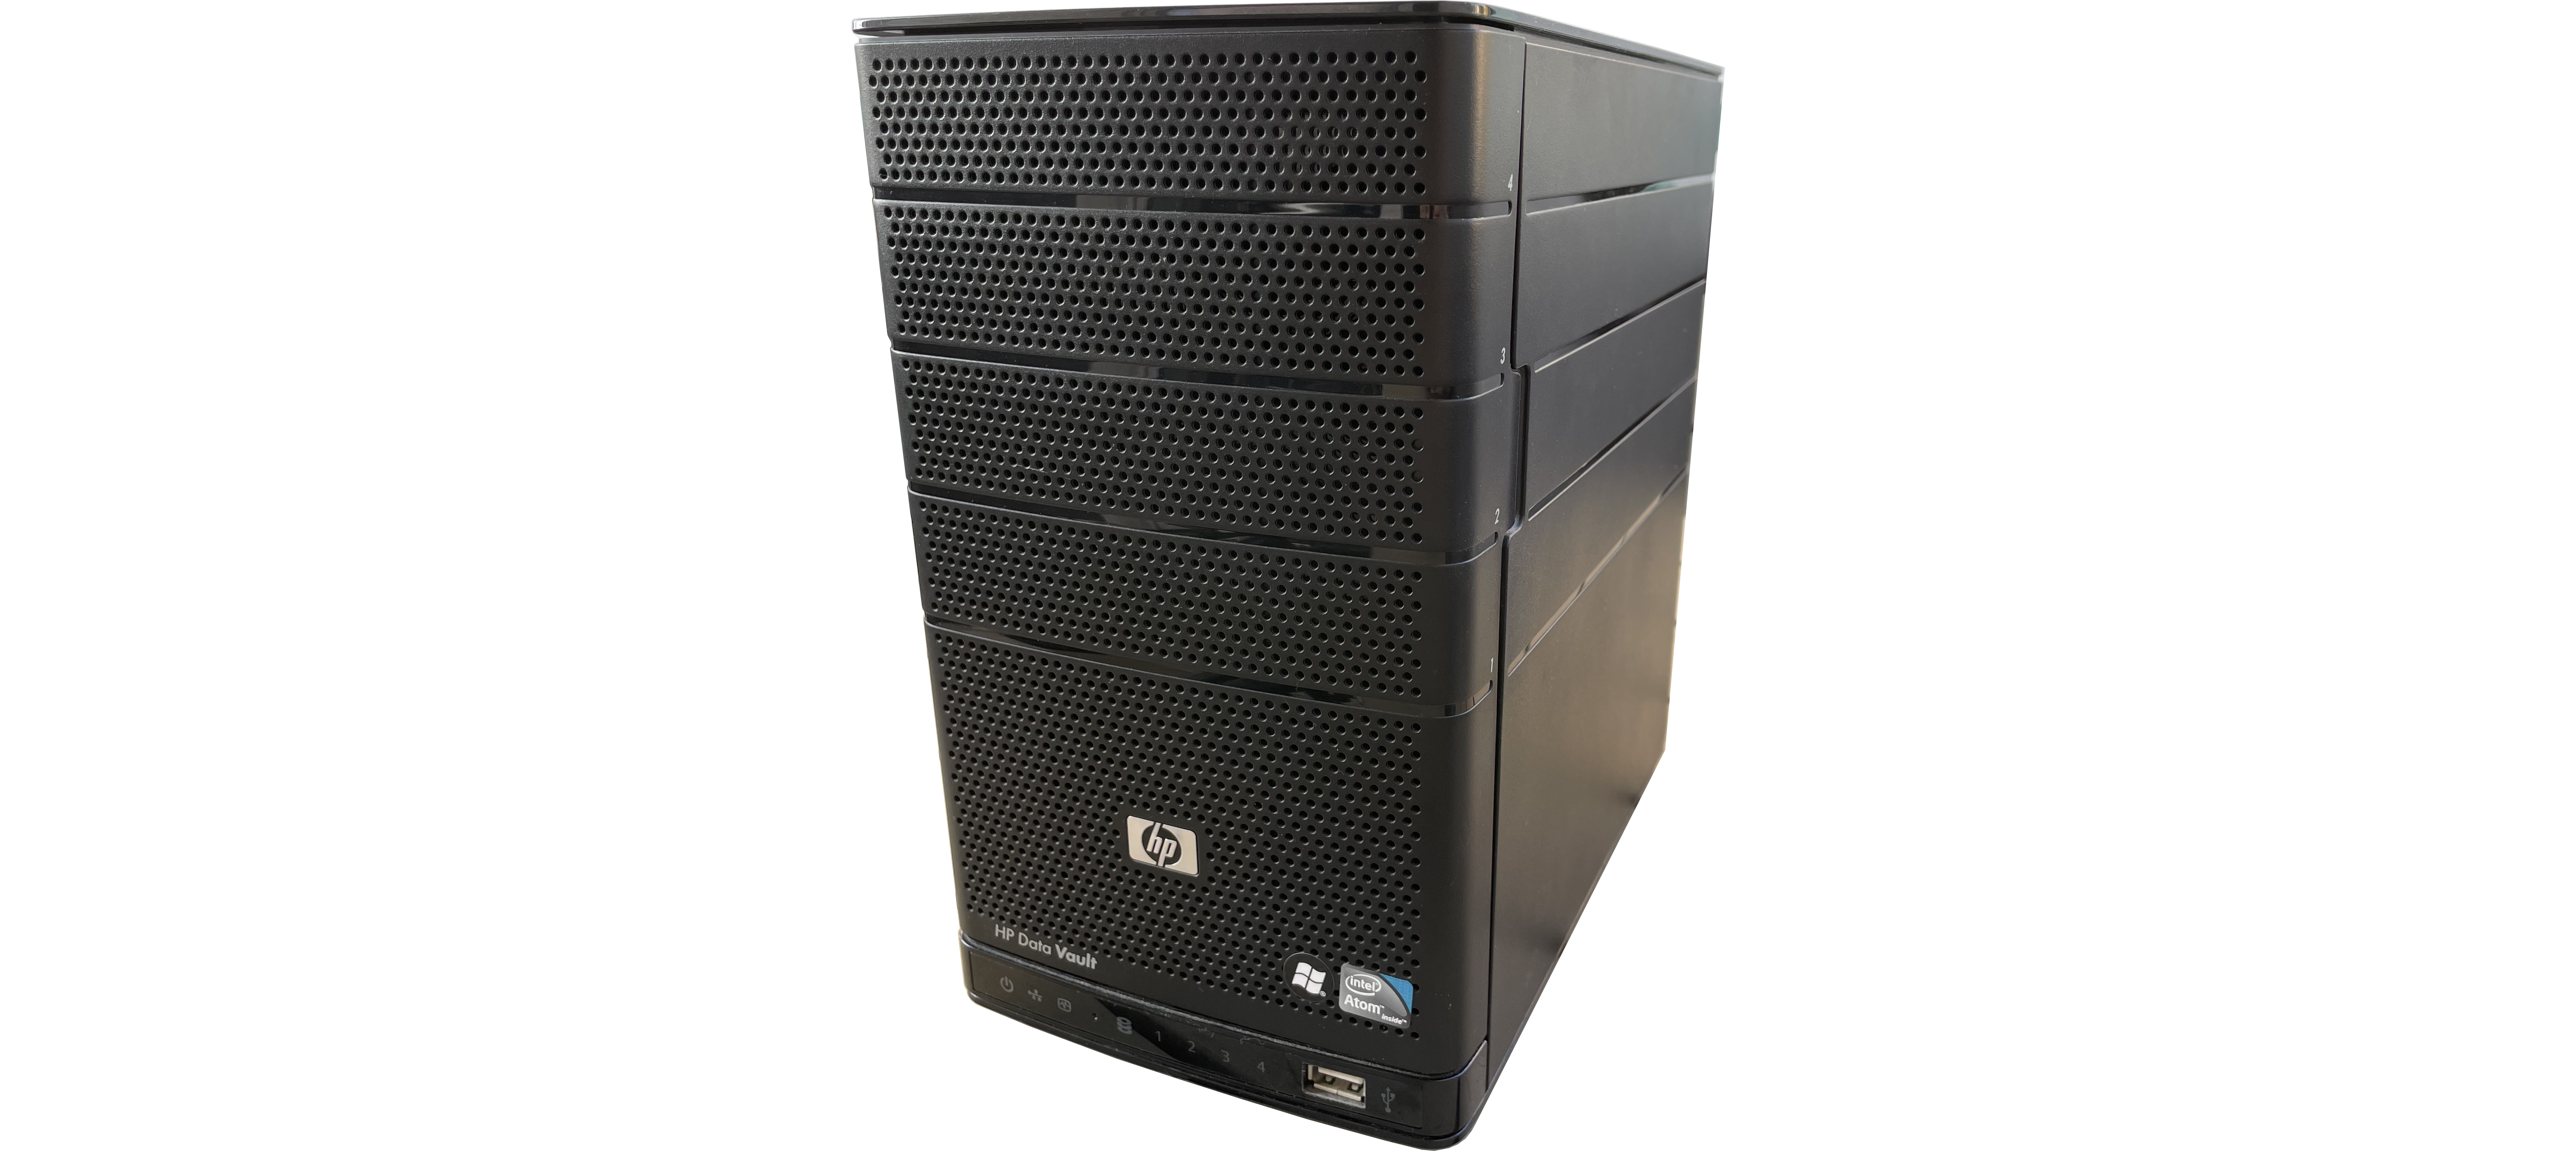
For a long time, I had a HP Data Vault X315 sitting in my cupboard. By now, this machine is about 15 years old and its specs are equally outdated: Intel Atom D510 CPU, 2 GB of RAM, and even an eSATA port. But most notably, it came with a total of 5 TB of harddrive space and all of the disks are perfectly fine. It would be a shame not to put them to good use again. So I decided to use it as my backup server.
Headless Installation
Although it is possible to connect an external display to the Data Vault via VGA by accessing debug pins on the motherboard I'd prefer a headless installation. In the past I've installed Debian by hooking it up to my old TV with VGA input but I don't want to go through the headaches of disassembling the system twice just to install some temporary wiring, again. As chance would have it, I recently learned that the NixOS installer has SSH enabled by default and I wanted to try out this Linux distro anyway.
NixOS itself is very stable because dependency conflicts don't happen with the Nix package manager. As a bonus feature, the entire configuration is done in /etc/nixos/configuration.nix and a new bootloader entry is created for each configuration change. In case of a bad change leaving the system in an unbootable state, you can just switch back to an old configuration. This makes NixOS a well-suited option for a reliable backup server.
Limitations
During the usage of the Data Vault with Debian I noticed that there was about a 20% chance of the system not booting. This annoyed me so much that I even took the time going through the trouble of connecting it to the TV again in order to see the BIOS output. It turned out that the BIOS sporadically didn't find the boot drive and was stuck in a loop looking for an option to boot over the network. Unfortunately, USB keyboards won't work in the BIOS1 so I couldn't change any options here. That's why I tried a different option: I ordered an eSATA to SATA cable to use an SSD which I had also lying around as system drive. It should allow for greater data rates than using a USB 2.0 to SATA adapter. Using an SSD as boot drive is a good idea in general and also recommended by professional NAS software like TrueNAS2. In theory the SSD should be more reliable since it doesn't need to spin up. In practice, booting from eSATA isn't supported by the BIOS. What a surprise.
Installing NixOS
System Layout
Nevertheless, with all the hardware limitations in place, I needed to work around all of them to turn this system into a reliable backup server. Definitely an interesting challenge. I came up with the following plan to get the most out of my devices:
- Install bootloader on the 1st HDD (the default boot device of the Data Vault)
- Use the SSD connected over eSATA as system drive mounted at
/ - Build two RAID arrays from the internal HDDs as storage for backups
Installing the Base System
For creating the installation medium3 I used the Minimal ISO image provied at the NixOS Download page. I unplugged all internal drives to make sure the system would boot from the flashed USB thumb drive. After some time, I checked on my router that a device with hostname nixos was showing up in the network and noted its IP address. In order to connect to the NixOS installer via SSH, a password for the user nixos has to be set. To achieve this, I connected a USB keyboard to the Data Vault and (blindly) typed passwd followed by the password and Enter, twice. In advance, I briefly confirmed this method in a VirtualBox VM.
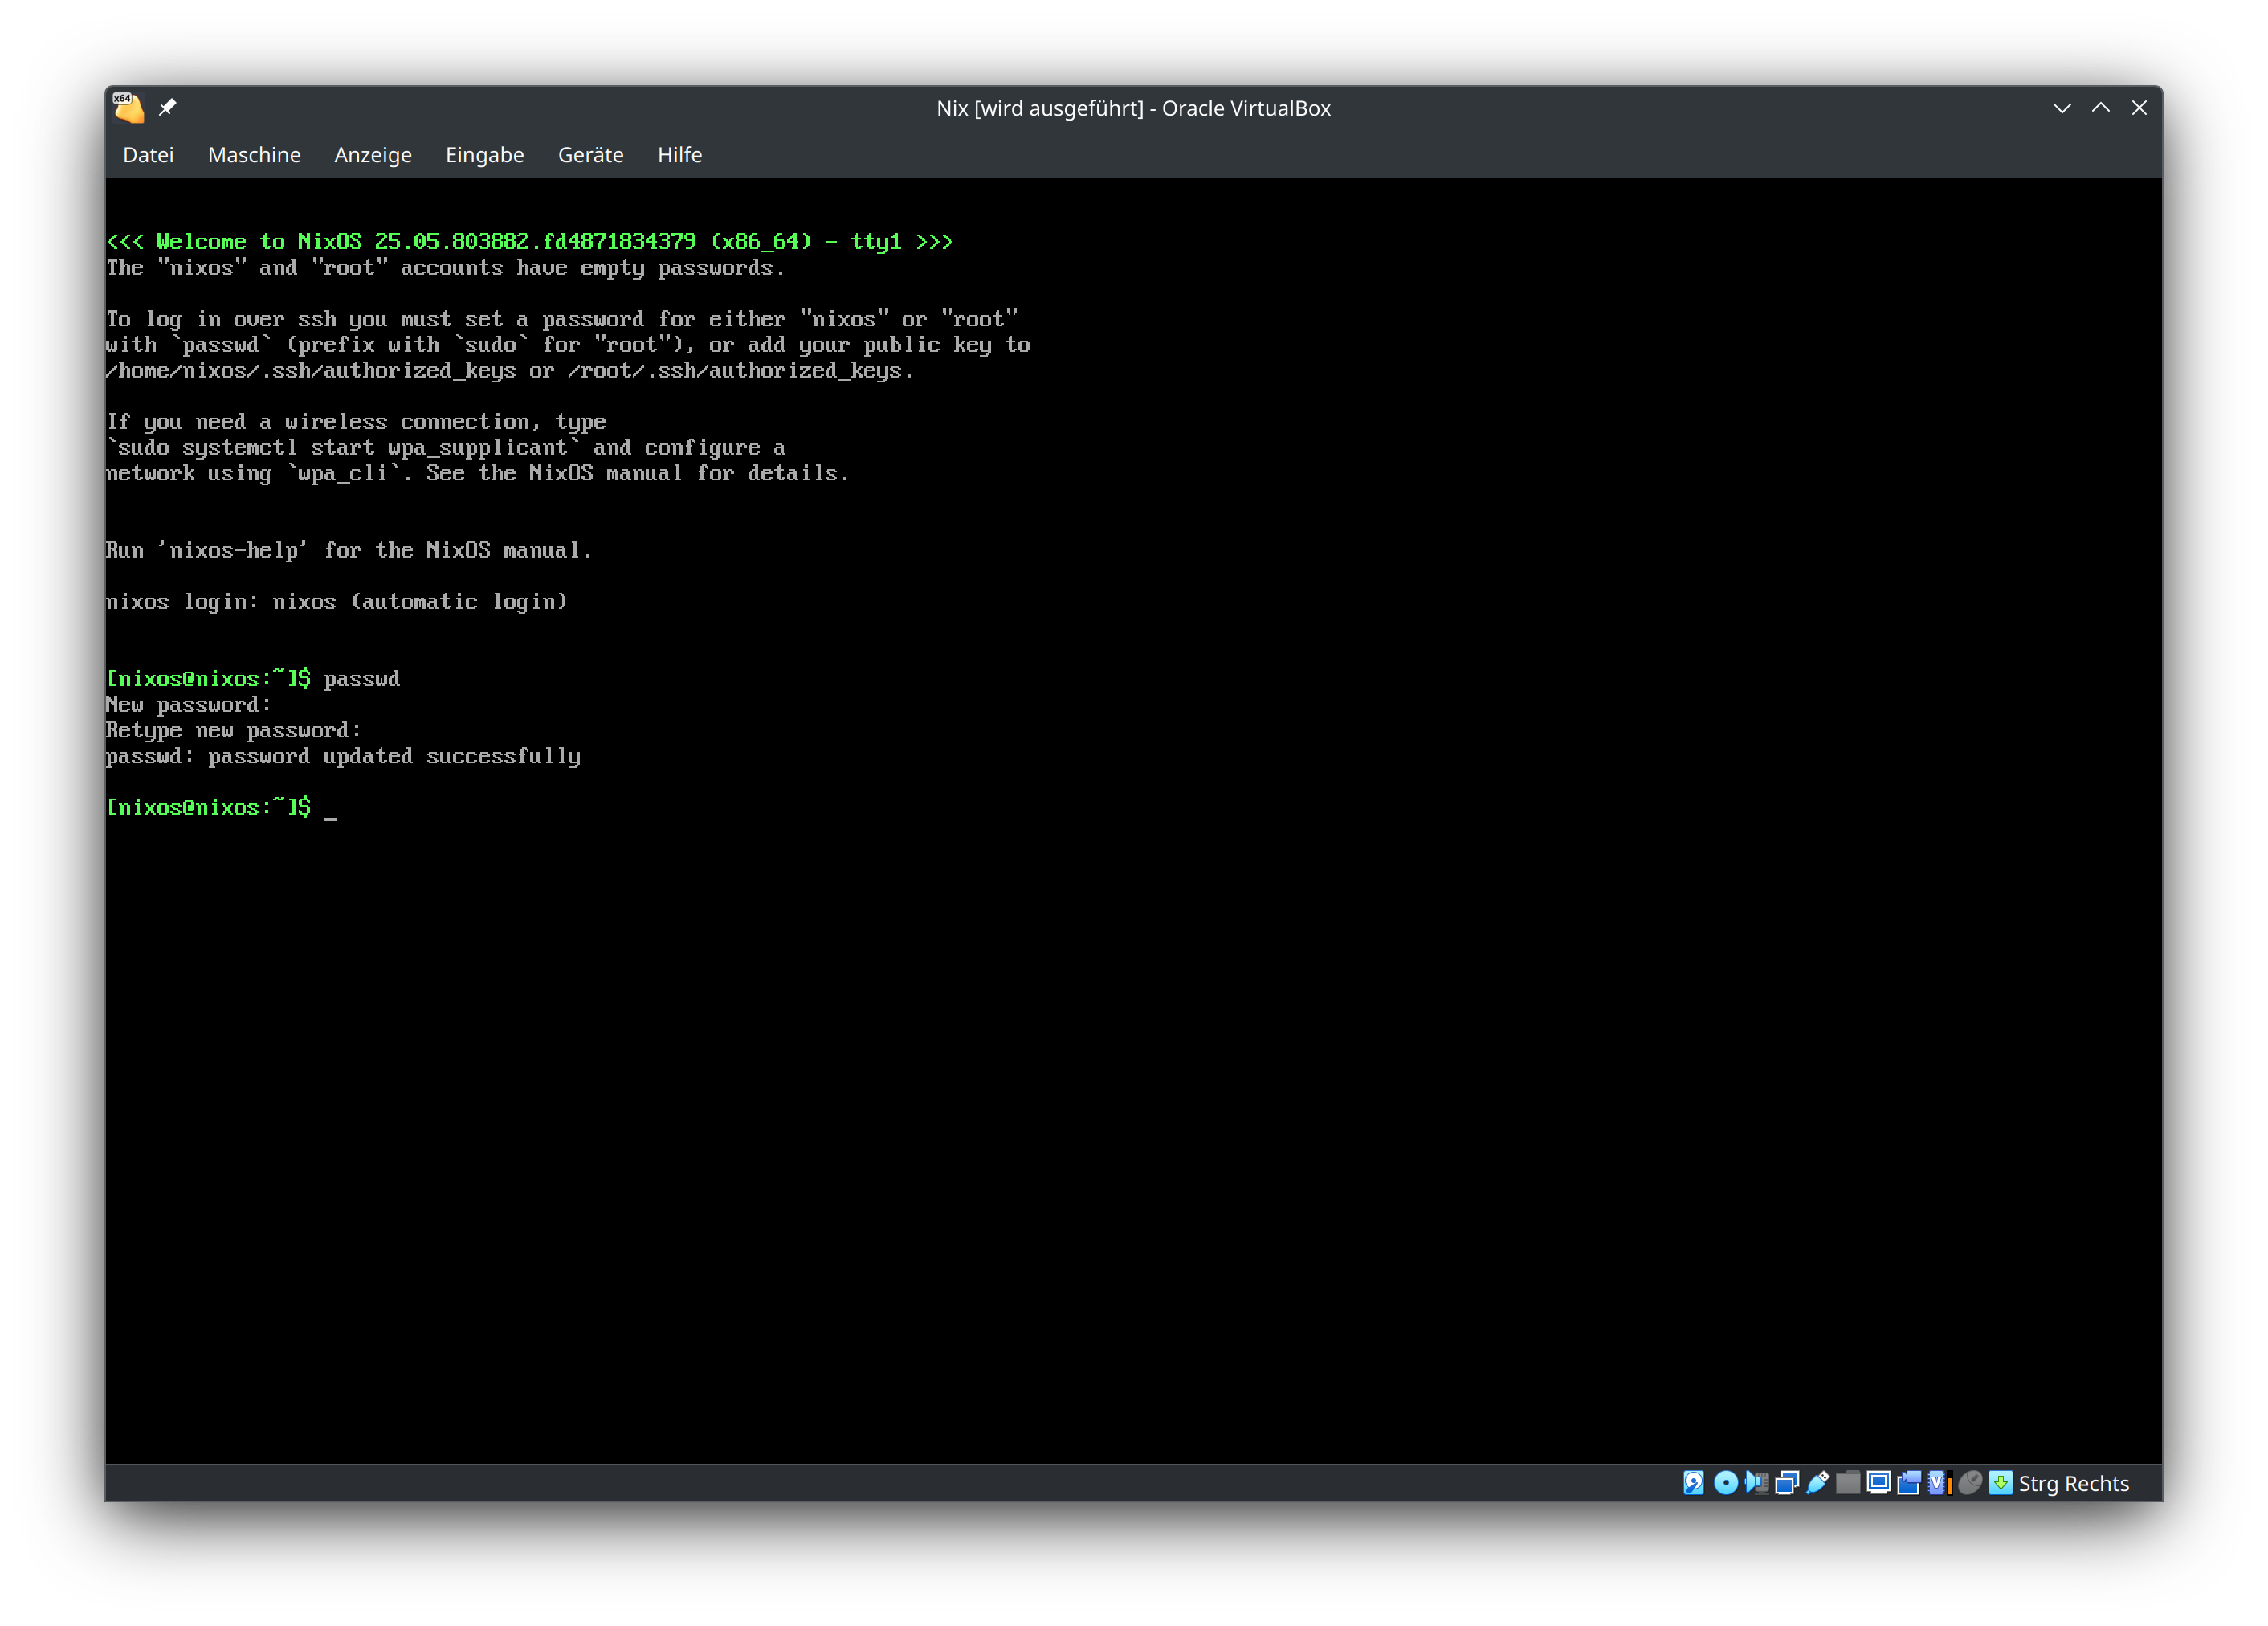
After the password was set, I could connect to the installer using ssh nixos@[IP] with [IP] being the previously noted IP address. I then followed the instructions from the Manual Installation section of the NixOS manual with some slight deviations. First, I reduced the size of the swap partition from 8 GB to 2 GB since I don't wanted the swap to be bigger than the actual RAM. Second, I formatted the SSD using the instructions from the manual but didn't set the boot flag.
# partitioning the SSD (here: /dev/sdb)
parted /dev/sdb -- mklabel msdos
parted /dev/sdb -- mkpart primary 1MB -2GB
parted /dev/sdb -- mkpart primary linux-swap -2GB 100%

# formatting the SSD
mkfs.ext4 -L nixos /dev/sdb1
mkswap -L swap /dev/sdb2

# mounting the target file system we just created
mount /dev/disk/by-label/nixos /mnt

# enabling swap
swapon /dev/sdb2

# generate the initial config file
nixos-generate-config --root /mnt
Next, I inserted the HDDs one by one starting with slot 1 to know which is which as they'd pop up as /dev/sdc to /dev/sdf. I then formatted all HDDs with the same partition scheme using the following commands:
fdisk /dev/sdX(replaceXwith the actual letter)o(new MBR partition table)n(new partition)p(primary partition, followed by accepting defaults)t(select partition type)da(non-FS data)ajust for/dev/sdc(toggle boot flag)w(write changes to disk)
All disks now had an MBR partition table with a single partition with the recommended type for use in software RAID arrays4. Additionally, the first HDD's boot flag was set to mark it as bootable for the BIOS. Before editing the generated configuration, I copied the ID of the disk linked to /dev/sdc.
# get the unique id of the 1st HDD
ls -la /dev/disk/by-id | grep "sdc"

# editing the config file
nano /mnt/etc/nixos/configuration.nix
In the NixOS configuration file, I first defined the option boot.loader.grub.device as stated in the manual using the previously copied ID. Then I uncommented the creation of a user account and enabled support for software RAIDs with mdadm. Last but not least, I enabled SSH to remotely connect to the system after the installation.
{
    # Define on which hard drive you want to install Grub.
    boot.loader.grub.device = "/dev/disk/by-id/wwn-0x5000c50026683caa";

    # Define a user account. Don't forget to set a password with ‘passwd’.
    users.users.florian = {
        isNormalUser = true;
        extraGroups = [ "wheel" ]; # Enable ‘sudo’ for the user.
    };

    # Enable mdadm
    boot.swraid = {
        enable = true;
    };

    # Enable the OpenSSH daemon.
    services.openssh.enable = true;
}
After saving the config file, I ran nixos-install to install NixOS. As a last step, I changed the password of the user defined above using nixos-enter --root /mnt -c 'passwd florian' and did a reboot into the newly installed system.
Storage Setup
Since the signature of the Data Vault has changed after the installation, I removed it from my local ~/.ssh/known_hosts file to connect again via SSH without warnings. Because the drive letters might have changed after rebooting, I ran lsblk to confirm them. The Data Vault came with two 1 TB and two 1.5 TB drives so I decided to create two mirrored RAID devices.
# create two RAID 1 arrays
mdadm --create --verbose --level=1 --metadata=1.2 --raid-devices=2 /dev/md/small /dev/sdc1 /dev/sdd1
mdadm --create --verbose --level=1 --metadata=1.2 --raid-devices=2 /dev/md/large /dev/sde1 /dev/sdf1

# list the RAID arrays
mdadm --detail --scan
I copied the results of the scan into the NixOS configuration for software RAID to explicitely tell mdadm to assemble these arrays on startup.
{
    boot.swraid = {
        enable = true;
        mdadmConf = ''
            ARRAY /dev/md/small metadata=1.2 UUID=423412a4:e15bfce6:b27cc4e7:ee4a607e
            ARRAY /dev/md/large metadata=1.2 UUID=2c2116bc:3c4a6a03:6fda85e3:4a394a8b
        '';
    };
}
After successfully creating the RAID arrays, I formatted both of them as ext4 setting stride and stripe-width according to the following formulas5:
\[ \begin{align*} \text{stride}&=\frac{\text{chunk size}}{\text{block size}}=\frac{\text{512 KiB}}{\text{4 KiB}}=\text{128} \\ \text{stripe width}&=\text{number of data disks}\cdot\text{stride}=\text{1}\cdot\text{128}=\text{128} \end{align*} \]
The default chunk size when creating an array with mdadm is 512 KiB. The default block size when creating an ext4 partition with mkfs.ext4 is 4 KiB. Since I've chosen a RAID 1 setup with two disks, the number of data disks is 1. The other disk is used for parity information.
mkfs.ext4 -L small -E stride=128,stripe-width=128 /dev/md/small
mkfs.ext4 -L large -E stride=128,stripe-width=128 /dev/md/large
As a last step, I created two mountpoints for the RAID devices at /mnt. The option nofail allows the mounting to be asynchronous and not cause a system startup failure when one of the RAID devices isn't ready in time.
{
    fileSystems."/mnt/small" = {
        device = "/dev/disk/by-label/small";
        fsType = "ext4";
        options = [ "nofail" ];
    };

    fileSystems."/mnt/large" = {
        device = "/dev/disk/by-label/large";
        fsType = "ext4";
        options = [ "nofail" ];
    };
}
Time Machine SMB Share
In order to use these directories as network shares, file permissions need to be set accordingly. That's were the group sambashare comes into play. I defined it in the NixOS configuration and added my user to this group.
{
    users.groups.sambashare = {
        members = [ "florian" ];
    };
}
For the group to become active, the configuration has to be applied using nixos-rebuild switch. After the rebuild I set the group as owner of both directories and gave its members full permissions. Additionally, I set the setgid bit of both directories so that all new files and subdirectories within would inherit the group ownership.
# set the 'sambashare' group as owner
chown :sambashare /mnt/small
chown :sambashare /mnt/large

# set the setgid bit (2), full permissions for owner (7) and group (7), just read and execute permissions for everyone else (5)
chmod 2775 /mnt/small
chmod 2775 /mnt/large
Next, I enabled the samba service and made sure to open the firewall since this option defaults to false. I learned this the hard way. Each directory got its own share with writing enabled and sambashare as forced group. The VFS module fruit is used to enhance the interoperability with macOS devices. The fruit:time machine option is necessary for the share to be shown as Time Machine destination. As you might have guessed from the name, I've reserved the smaller share for backups of my Linux devices. More on that topic will be covered in future posts. Stay tuned!
{
    services.samba = {
        enable = true;
        openFirewall = true;
        settings = {
            global = {
                "inherit permissions" = "yes";
                "fruit:nfs_aces" = "no";
            };
            "borgbackup" = {
                "path" = "/mnt/small";
                "writeable" = "yes";
                "force group" = "sambashare";
                "vfs objects" = "catia fruit streams_xattr";
            };
            "timemachine" = {
                "path" = "/mnt/large";
                "writeable" = "yes";
                "force group" = "sambashare";
                "vfs objects" = "catia fruit streams_xattr";
                "fruit:time machine" = "yes";
            };
        };
    };
}
The last piece of the puzzle is to announce the SMB shares on the network in order to be discovered by Macs. To achieve that, I enabled the avahi service with the option to publish user services like samba. For avahi, openFirewall is actually set by default so no need to explicitely activate it here. The option nssmdns4 allows the hostname datavault.local to be resolved to its IPv4 address. Via the option extraServiceFiles, the Data Vault is disguised as an AirPort Time Capsule so macOS will offer it as a backup target without further configuration.
{
services.avahi = {
enable = true;
nssmdns4 = true;
publish = {
enable = true;
userServices = true;
};
extraServiceFiles = {
timemachine = ''
<?xml version="1.0" standalone='no'?>
<!DOCTYPE service-group SYSTEM "avahi-service.dtd">
<service-group>
<name replace-wildcards="yes">%h</name>
<service>
<type>_smb._tcp</type>
<port>445</port>
</service>
<service>
<type>_device-info._tcp</type>
<port>0</port>
<txt-record>model=TimeCapsule8,119</txt-record>
</service>
<service>
<type>_adisk._tcp</type>
<!-- When changed, replace 'timemachine' with the new name of the samba share! -->
<txt-record>dk0=adVN=timemachine,adVF=0x82</txt-record>
<txt-record>sys=waMa=0,adVF=0x100</txt-record>
</service>
</service-group>
'';
};
};
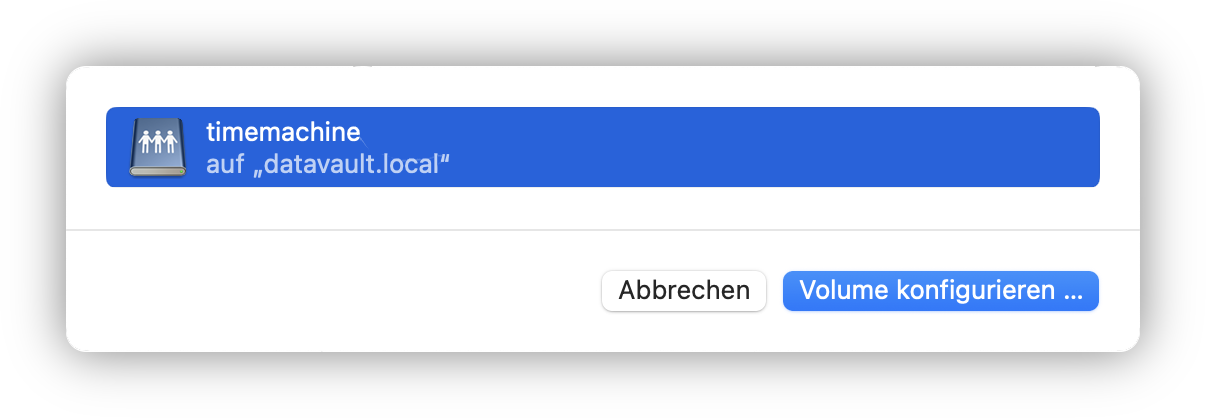
}For all those changes to take effect, I ran nixos-rebuild switch again, followed by smbpasswd -a florian to set an SMB password for my user account. I then switched to my Mac to activate Time Machine and started the first backup. The network share showed up immediately without prior connection in Finder.
Summary
In conclusion, backing up my Mac is working seamlessly using the setup described in this article. You can also find the complete configuration.nix file on GitHub. With the new partition layout, I'm also no longer experiencing startup issues with the Data Vault. I can finally just press the power button, let my Mac do a backup, and press the power button again. What a joy!
PS/2 keyboards will work in the BIOS when they are connected via the debug pins mentioned above but I had none lying around and didn't want to buy one or an adapter to USB if I'd need it just once.